


互联网为用户提供了各种房源数据,在爬虫的爬取下集中有用的数据,可以为用户挖掘出隐藏在网络数据中所有的房源分布情况以及价格等走向,帮助用户做更好的决策。


 1、Scrapy框架
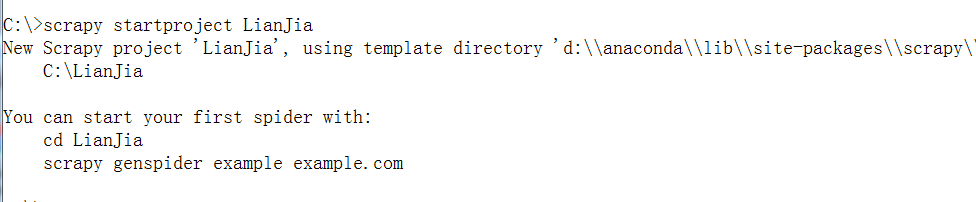
制作Scrapy爬虫一共需要四步:
新建一个Scrapy爬虫项目(scrapy startproject 项目名)
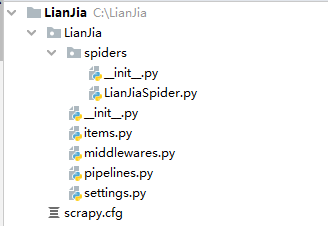
创建项目后,使用Pycharm打开项目,会有以下文件:
LianJiaSpider.py:爬虫文件,需要自己编写爬虫规则。
items.py:爬虫项目要爬取的字段需要在此文件中定义。
middlewares.py:中间件文件,可以拓展爬虫功能,比如:使用selenium、代理IP、Cookie池、随机UA等。
pipelines.py:存储数据文件,需要在此文件中进行数据存储代码的编写。
settings.py:scrapy项目的配置文件。
明确目标(编写items.py),明确要抓取的内容

制作爬虫(编写spider文件),制作爬虫开始爬取网页
# -*- coding: utf-8 -*-
import scrapy
from ..items import LjzfItem
class ZufangSpider(scrapy.Spider):
    name = 'zufang'
    allowed_domains = ['zufang.com']
    start_urls = ['https://bj.lianjia.com/ershoufang/']
    def isnone(self, info):
        if info is None:
            return 'Nan'
        else:
            return info
    def parse(self, response):
        region_list = response.xpath('/html/body/div[3]/div/div[1]/dl[2]/dd/div[1]/div/a')
        for region in region_list:
            # 获取城区
            region_name = region.xpath('./text()').extract()[0]
            # 获取城区url
            region_url = region.xpath('./@href').extract()[0]
            region_url_full = "https://bj.lianjia.com" + region_url
            yield scrapy.Request(url=region_url_full, callback=self.parse2, dont_filter=True)
    def parse2(self, response):
        small_list = response.xpath('/html/body/div[3]/div/div[1]/dl[2]/dd/div[1]/div[2]/a')
        for small in small_list:
            # 小城区名字
            small_name = small.xpath('./text()').extract()[0]
            # 小城区url
            small_url = small.xpath('./@href').extract()[0]
            small_url_full = 'https://bj.lianjia.com' + small_url
            # print(small_url_full)
            # print(small_name, small_url_full)
            yield scrapy.Request(url=small_url_full, callback=self.parse3, dont_filter=True)
    def parse3(self, response):
        # 发起请求
        try:
            house_url_list = response.xpath('//*[@id="content"]/div[1]/ul/li[1]/div[1]/div/a')
            # print(page_full_list)
            for house in house_url_list:
                # 房子url
                house_url = house.xpath('./@href').extract()[0]
                # print(house_url)
                # 房子标题
                house_name = house.xpath('./text()').extract()[0]
                print(house_url, house_name)
                yield scrapy.Request(url=house_url, callback=self.parse4, dont_filter=True)
        except:
            pass
    def parse4(self, response):
        # 标题
        house_title = response.xpath("/html/body/div[3]/div/div/div[1]/h1/text()").extract()[0]
        # 描述
        house_desc = response.xpath("/html/body/div[3]/div/div/div[1]/div/text()").extract()[0]
        # 价格
        house_price = response.xpath("/html/body/div[5]/div[2]/div[3]/span/text()").extract()[0] + "万"
        # 户型
        # house_type = response.xpath("/html/body/div[5]/div[2]/div[4]/div[1]/div[1]/text()").extract()[0]
        # 房子朝向
        # house_facing = response.xpath("/html/body/div[5]/div[2]/div[4]/div[2]/div[1]/text()").extract()[0]
        # 房子面积
        house_area = response.xpath("/html/body/div[5]/div[2]/div[4]/div[3]/div[1]/text()").extract()[0]
        # 所在区域
        region1 = response.xpath('/html/body/div[5]/div[2]/div[5]/div[2]/span[2]//text()').extract()[0]
        region2 = response.xpath('/html/body/div[5]/div[2]/div[5]/div[2]/span[2]//text()').extract()[2]
        region = region1 + region2
        # 房屋户型
        house_type = response.xpath('//*[@id="introduction"]/div/div/div[1]/div[2]/ul/li[1]/text()').extract()[0]
        # 所在楼层
        floor = response.xpath('//*[@id="introduction"]/div/div/div[1]/div[2]/ul/li[2]/text()').extract()[0]
        # 建筑面积
        building_area = response.xpath('//*[@id="introduction"]/div/div/div[1]/div[2]/ul/li[3]/text()').extract()[0]
        # 户型结构
        house_structure = response.xpath('//*[@id="introduction"]/div/div/div[1]/div[2]/ul/li[4]/text()').extract()[0]
        # 套内面积
        using_area = response.xpath('//*[@id="introduction"]/div/div/div[1]/div[2]/ul/li[5]/text()').extract()[0]
        # 建筑类型
        building_type = response.xpath('//*[@id="introduction"]/div/div/div[1]/div[2]/ul/li[6]/text()').extract()[0]
        # 房屋朝向
        house_facing = response.xpath('//*[@id="introduction"]/div/div/div[1]/div[2]/ul/li[7]/text()').extract()[0]
        # 建筑结构
        building_structure = response.xpath('//*[@id="introduction"]/div/div/div[1]/div[2]/ul/li[8]/text()').extract()[
            0]
        # 装修情况
        renovation = response.xpath('//*[@id="introduction"]/div/div/div[1]/div[2]/ul/li[9]/text()').extract()[0]
        # 梯户比例
        tighubi = response.xpath('//*[@id="introduction"]/div/div/div[1]/div[2]/ul/li[10]/text()').extract()[0]
        # 供暖方式
        heating_mode = response.xpath('//*[@id="introduction"]/div/div/div[1]/div[2]/ul/li[11]/text()').extract()[0]
        # 配备电梯
        elevator = self.isnone(
            response.xpath('//*[@id="introduction"]/div/div/div[1]/div[2]/ul/li[12]/text()').extract()[0])
        # 挂牌时间
        listing_time = \
            response.xpath('//*[@id="introduction"]/div/div/div[2]/div[2]/ul/li[1]/span[2]/text()').extract()[0]
        # 交易权属
        transaction_att = \
            response.xpath('//*[@id="introduction"]/div/div/div[2]/div[2]/ul/li[2]/span[2]/text()').extract()[0]
        # 上次交易
        last_transaction_time = \
            response.xpath('//*[@id="introduction"]/div/div/div[2]/div[2]/ul/li[3]/span[2]/text()').extract()[0]
        # 房屋用途
        purpose = response.xpath('//*[@id="introduction"]/div/div/div[2]/div[2]/ul/li[4]/span[2]/text()').extract()[0]
        # 房屋年限
        years = response.xpath('//*[@id="introduction"]/div/div/div[2]/div[2]/ul/li[5]/span[2]/text()').extract()[0]
        # 产权所属
        subordinate = response.xpath('//*[@id="introduction"]/div/div/div[2]/div[2]/ul/li[6]/span[2]/text()').extract()[
            0]
        # 抵押信息
        mortgage_info = \
            response.xpath('//*[@id="introduction"]/div/div/div[2]/div[2]/ul/li[7]/span[2]/text()').extract()[0]
        # 房本条件
        house_condition = self.isnone(
            response.xpath('//*[@id="introduction"]/div/div/div[2]/div[2]/ul/li[8]/span[2]/text()').extract()[0])
item = LjzfItem()
item['house_title'] = house_title
item['house_desc'] = house_desc
item['house_price'] = house_price
item['house_area'] = house_area
item['region'] = region
item['house_type'] = house_type
item['floor'] = floor
item['building_area'] = building_area
item['house_structure'] = house_structure
item['using_area'] = using_area
item['house_facing'] = house_facing
item['building_structure'] = building_structure
item['renovation'] = renovation
item['tighubi'] = tighubi
item['elevator'] = elevator
item['listing_time'] = listing_time
item['transaction_att'] = transaction_att
item['last_transaction_time'] = last_transaction_time
item['purpose'] = purpose
item['years'] = years
item['subordinate'] = subordinate
item['mortgage_info'] = mortgage_info
item['house_condition'] = house_condition
yield item
存储内容(编写pipelines.py),设计管道存储爬取的内容
import pymongo
class LjzfPipeline(object):
    def __init__(self):
        self.client = pymongo.MongoClient('localhost', 27017)
        self.db = self.client['esf']
        self.collection = self.db['info']
    def process_item(self, item, spider):
        self.collection.insert(dict(item))
        return item
MongoDB是一个基于分布式文件存储的数据库。由C++语言编写。旨在为WEB应用提供可扩展的高性能数据存储解决方案。
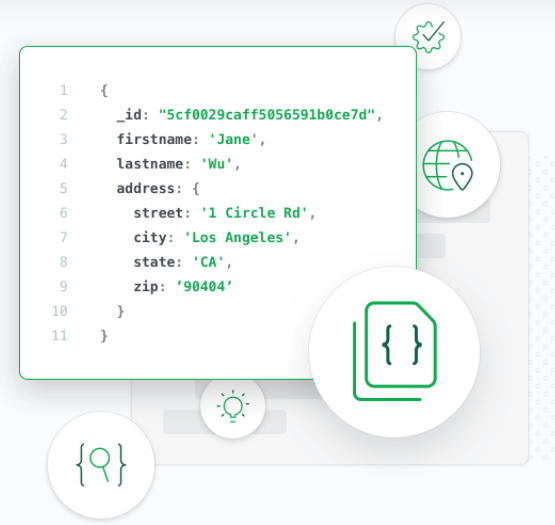
MongoDB是一个介于关系数据库和非关系数据库之间的产品,是非关系数据库当中功能最丰富,最像关系数据库的。它支持的数据结构非常松散,是类似JSON的BSON格式,因此可以存储比较复杂的数据类型。MongoDB最大的特点是它支持的查询语言非常强大,其语法有点类似于面向对象的查询语言,几乎可以实现类似关系数据库单表查询的绝大部分功能,而且还支持对数据建立索引。
它的特点是高性能、易部署、易使用,存储数据非常方便,主要特点如下:
面向集合存储,易存储对象类型的数据。
模式自由。
支持动态查询。
支持完全索引,可以在任意属性上建立索引,包含内部对象。可以在指定属性、内部对象上创建索引以提高查询的速度。除此之外,MongoDB 还提供创建基于地理空间的索引的能力。
支持查询。
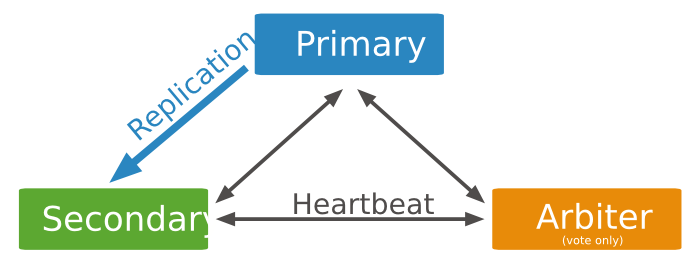
支持复制和故障恢复。MongoDB 支持主从复制机制,可以实现数据备份、故障恢复、读扩展等功能。而基于副本集的复制机制提供了自动故障恢复的功能,确保了集群数据不会丢失。
使用高效的二进制数据存储,包括大型对象(如视频等)。
自动处理分片,以支持云计算层次的扩展性。MongoDB 支持集群自动切分数据,对数据进行分片可以使集群存储更多的数据,实现更大的负载,也能保证存储的负载均衡。
文件存储格式为BSON(一种JSON的扩展)。BSON 是对二进制格式的JSON 的简称,BSON 支持文档和数组的嵌套。
可通过网络访问。
使用原理:
所谓“面向集合”,意思是数据被分组存储在数据集中,被称为一个集合(Collection)。每个集合在数据库中都有一个唯一的标识名,并且可以包含无限数目的文档。集合的概念类似关系型数据库管理系统(RDBMS)里的表,不同的是它不需要定义任何模式。能够快速识别数据库内大数据集中的热数据,提供一致的性能改进。
模式自由,意味着对于存储在MongoDB数据库中的文件,我们不需要知道它的任何结构定义。如果需要的话,你完全可以把不同结构的文件存储在同一个数据库里。
存储在集合中的文档,被存储为键-值对的形式。键用于唯一标识一个文档,为字符串类型,而值则可以是各种复杂的文件类型。我们称这种存储形式为BSON。
MongoDB已经在多个站点部署,其主要场景如下:
1)网站实时数据处理。它非常适合实时的插入、更新与查询,并具备网站实时数据存储所需的复制及高度伸缩性。
2)缓存。由于性能很高,它适合作为信息基础设施的缓存层。在系统重启之后,由它搭建的持久化缓存层可以避免下层的数据源过载。
3)高伸缩性的场景。非常适合由数十或数百台服务器组成的数据库,它的路线图中已经包含对MapReduce引擎的内置支持。
不适用的场景如下:
1)要求高度事务性的系统。
2)传统的商业智能应用。
3)复杂的跨文档(表)级联查询。
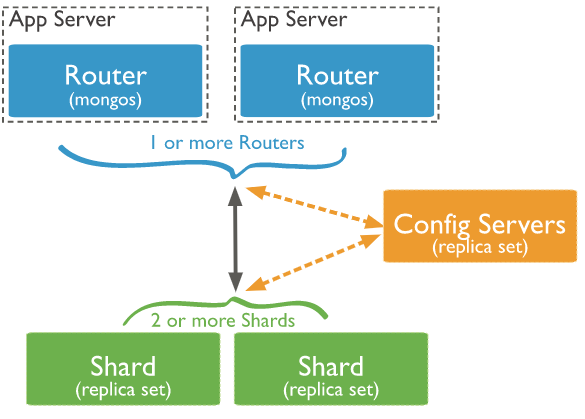
shard:每个分片包含分片数据的子集。每个分片都可以部署为副本集(replica set)。可以分片,不分片的数据存于主分片服务器上。部署为3成员副本集。
mongos:mongos充当查询路由器,提供客户端应用程序和分片集群之间的接口。可以部署多个mongos路由器。部署1个或者多个mongos。
config servers:配置服务器存储群集的元数据和配置设置。从MongoDB 3.4开始,必须将配置服务器部署为3成员副本集。

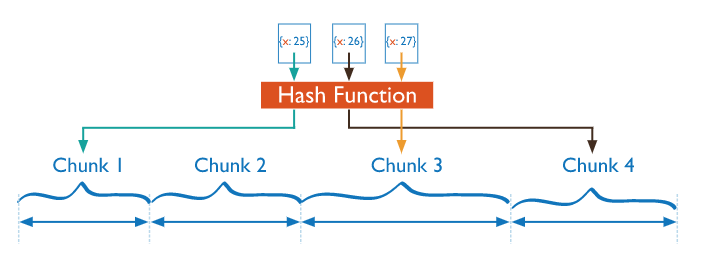
散列分片
使用散列索引在共享群集中分区数据。散列索引计算单个字段的哈希值作为索引值; 此值用作分片键。
使用散列索引解析查询时,MongoDB会自动计算哈希值。应用程序也不会需要计算哈希值。
基于散列值的数据分布有助于更均匀的数据分布,尤其是在分片键单调变化的数据集中。
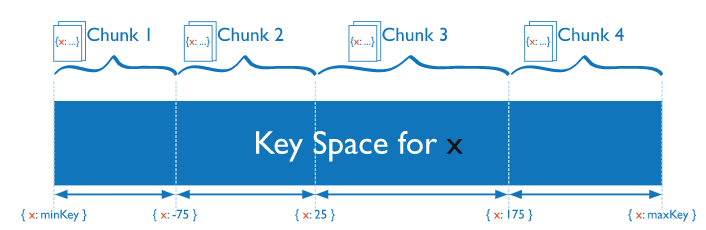
范围分片
基于分片键值将数据分成范围。然后根据分片键值为每个块分配一个范围。
Mongos可以将操作仅路由到包含所需数据的分片。
分片键的规划很重要,可能导致数据不能均匀分布。
3、XPath使用
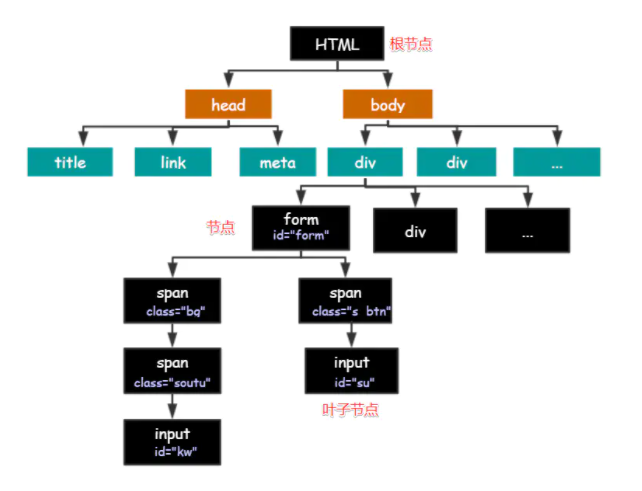
所谓 Xpath,是指 XML path language。path 就是路径,Xpath 是一种用在XML文档中定位元素的语言,同样也支持 HTML 元素的解析, Xpath 主要是通过路径来查找元素。
HTML 的结构就是树形结构,HTML 是根节点,所有的其他元素节点都是从根节点发出的。其他的元素都是这棵树上的节点Node,每个节点还可能有属性和文本。而路径就是指某个节点到另一个节点的路线。
节点之间存在各种关系:
父节点(Parent): HTML 是 body 和 head 节点的父节点;
子节点(Child):head 和 body 是 HTML 的子节点;
兄弟节点(Sibling):拥有相同的父节点,head 和 body 就是兄弟节点。title 和 div 不是兄弟,因为他们不是同一个父节点。
祖先节点(Ancestor):body 是 form 的祖先节点,爷爷辈及以上;
后代节点(Descendant):form 是 HTML 的后代节点,孙子辈及以下。
| 表达式 | 描述 |
|---|---|
| nodename | 选取此节点的所有子节点。 |
| / | 从根节点选取。 |
| // | 从匹配选择的当前节点选择文档中的节点,而不考虑它们的位置。 |
| .. | 选取当前节点的父节点。 |
| . | 选取当前节点。 |
| @ | 选取属性。 |
| * | 匹配任何元素节点。 |
| @* | 匹配任何属性节点。 |
| node() | 匹配任何类型的节点。 |
| ancestor | 选取当前节点的所有先辈(父、祖父等)。 |
| ancestor-or-self | 选取当前节点的所有先辈(父、祖父等)以及当前节点本身。 |
| attribute | 选取当前节点的所有属性。 |
| child | 选取当前节点的所有子元素。 |
| descendant | 选取当前节点的所有后代元素(子、孙等)。 |
| descendant-or-self | 选取当前节点的所有后代元素(子、孙等)以及当前节点本身。 |
| following | 选取文档中当前节点的结束标签之后的所有节点。 |
| following-sibling | 选取当前节点之后的所有兄弟节点 |
| namespace | 选取当前节点的所有命名空间节点。 |
| parent | 选取当前节点的父节点。 |
| preceding | 选取文档中当前节点的开始标签之前的所有节点。 |
| preceding-sibling | 选取当前节点之前的所有同级节点。 |
| | | 计算两个节点集 |
| + | 加法 |
| - | 减法 |
| * | 乘法 |
| div | 除法 |
| = | 等于 |
| != | 不等于 |
| < | 小于 |
| <= | 小于或等于 |
| > | 大于 |
| >= | 大于或等于 |
| or | 或 |
| and | 与 |
| mod | 计算除法的余数 |
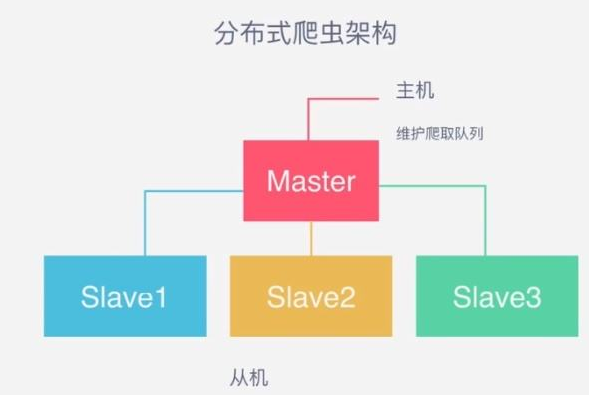
4、Scrapy-Redis分布式
分布式爬虫就是多台计算机上都安装爬虫程序,重点是联合采集。比如爬虫A,B,C分别在三台服务器上,需要一个状态管理器集中分配,去重这三个爬虫的url,状态管理器也是一个服务,需要部署在某一个服务器上,通过状态管理器集中分配需要抓取的URL,以及去重。
分布式爬虫优点:
1、充分利用多机器的带宽进行加速的爬取,一台服务器上的带宽有限。
2、充分利用多机器的IP加速爬取的速度,一台服务器如果爬取过快则可能IP会被封。
分布式爬虫:多台服务器有序的爬取任务队列中的URL。
Scrapy-Redis分布式爬虫,主要采用了Redis数据库的集合做去重操作,去重代码如下:
def request_seen(self, request):
    """Returns True if request was already seen.

    Parameters
    ----------
    request : scrapy.http.Request

    Returns
    -------
    bool

    """
    fp = self.request_fingerprint(request)
    # This returns the number of values added, zero if already exists.
    added = self.server.sadd(self.key, fp)
    return added == 0
def request_fingerprint(self, request):
    """Returns a fingerprint for a given request.

    Parameters
    ----------
    request : scrapy.http.Request

    Returns
    -------
    str

    """
    return request_fingerprint(request)
def request_fingerprint(request, include_headers=None):
    """
    Return the request fingerprint.

    The request fingerprint is a hash that uniquely identifies the resource the
    request points to. For example, take the following two urls:

    http://www.example.com/query?id=111&cat=222
    http://www.example.com/query?cat=222&id=111

    Even though those are two different URLs both point to the same resource
    and are equivalent (ie. they should return the same response).

    Another example are cookies used to store session ids. Suppose the
    following page is only accesible to authenticated users:

    http://www.example.com/members/offers.html

    Lot of sites use a cookie to store the session id, which adds a random
    component to the HTTP Request and thus should be ignored when calculating
    the fingerprint.

    For this reason, request headers are ignored by default when calculating
    the fingeprint. If you want to include specific headers use the
    include_headers argument, which is a list of Request headers to include.

    """
    if include_headers:
        include_headers = tuple(to_bytes(h.lower())
                                 for h in sorted(include_headers))
    cache = _fingerprint_cache.setdefault(request, {})
    if include_headers not in cache:
        fp = hashlib.sha1()
        fp.update(to_bytes(request.method))
        fp.update(to_bytes(canonicalize_url(request.url)))
        fp.update(request.body or b'')
        if include_headers:
            for hdr in include_headers:
                if hdr in request.headers:
                    fp.update(hdr)
                    for v in request.headers.getlist(hdr):
                        fp.update(v)
        cache[include_headers] = fp.hexdigest()
    return cache[include_headers]
在settings.py文件中添加如下配置:
#去重组件,在redis数据库里做去重操作
DUPEFILTER_CLASS = "scrapy_redis.dupefilter.RFPDupeFilter"
#使用scrapy_redis的调度器,在redis里分配请求
SCHEDULER = "scrapy_redis.scheduler.Scheduler"
# 是否在开始之前清空 调度器和去重记录,True=清空,False=不清空
SCHEDULER_FLUSH_ON_START = False
# 去调度器中获取数据时,如果为空,最多等待时间(最后没数据,未获取到)。
SCHEDULER_IDLE_BEFORE_CLOSE = 10
# 是否在关闭时候保留原来的调度器和去重记录,True=保留,False=清空
SCHEDULER_PERSIST = True
# Redis服务器地址
REDIS_HOST = '127.0.0.1'
# Redis端口
REDIS_PORT = 6379
更改爬虫文件,父类选择使用RedisSpider继承,并设置redis_key:
# 导入包
from scrapy_redis.spiders import RedisSpider
class 爬虫项目(RedisSpider):
    # 设置redis_key,在redis命令行里运行的时候,指定起始的URL,爬虫启动,类似于scrapy  crawl  爬虫名
    redis_key = "ZufangSpider:start_urls"
配置好Scrapy-Redis,程序运行后,会出现空跑问题,需创建extension.py文件,并添加以下代码后将该文件路径添加到settings.py中的EXTENSIONS值中:
import logging

from scrapy import signals
from scrapy.exceptions import NotConfigured

logging = logging.getLogger(__name__)

class RedisSpiderSmartIdleClosedExensions(object):
    def __init__(self, idle_number, crawler):
        self.crawler = crawler
        self.idle_number = idle_number
        self.idle_list = []
        self.idle_count = 0
    def spider_idle(self, spider):
        # 程序启动的时候会调用这个方法一次,之后每隔5秒再请求一次
        # 当持续半个小时都没有spider.redis_key,就关闭爬虫
        # 判断是否存在 redis_key
        if not spider.server.exists(spider.redis_key):
            self.idle_count += 1
        else:
            self.idle_count = 0
        if self.idle_count > self.idle_number:
            # 执行关闭爬虫操作
            self.crawler.engine.close_spider(spider, 'Waiting time exceeded')
Copyright©1999- 北京中公教育科技有限公司 .All Rights Reserved 京ICP备10218183号-88
京ICP证161188号  京公网安备11010802020723号
  投诉建议:400-650-7353


 视频教程
视频教程

 项目简介
项目简介

 环境配置
环境配置

 代码框架规范

 整体架构
整体架构
 1、Scrapy框架

